
Which Renko trading strategies are the best to trade – those for a Renko trading system or trading method? When trying to make this decision there are trade-offs that must be considered.
For instance, do you want to trade a Renko trading system that is more mechanical and easier to learn? Or do you want to trade a Renko trading method that would take longer to learn, because of using trade setup filtering for low odds trades?
But after learning trade setup filtering, your method trading would be more profitable than system trading – now what would your Renko trading strategies decision be then?
Renko Trading Strategies Decisions And Tradeoffs
Consider the tradeoff between the Renko system being easier to learn, but ultimately the Renko method being more profitable. This might lead a trader to make a decision to learn the method.
But again, this is not a simple question – for instance:
- What if this doesn’t have to be an either-or decision?
- What if you could learn the Renko system and trade it profitably, with the objective of then learning the method?
This could be a good approach IF the system was adapted from the Renko method. Meaning that learning the system and then the method, did not entail unlearning and relearning – that the Renko trading strategies for the method were an extension of those for the Renko system.
When trying to learn our trading strategies, start with the Renko system first and then progress further into learning and trading the Renko method. And especially do this while learning:
- Study the system trades results by applying the trading method filters to the chart and see what those results would be
- This would be a very good way to learn Renko trading in steps
- Eventually, I think you will see that the Renko method strategies avoid more losing trades than they miss winning trades
It is important when trying to learn a skill like trading to have steps and progressions that show accomplishments along the way. Because if not, it can become very frustrating and lead to many self-doubts.
Renko Trading Strategies Training
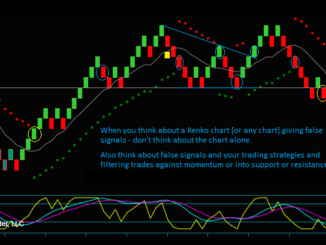
I think that never trading until all the Renko method strategies were understood is not necessary or the best approach. This will become more apparent when we discuss the chart below. It is a chart where the system was profitable [even if the method was more profitable], and the trade setup filters were not difficult to apply.
Renko Trading System And Method Differences
To begin with, the Renko trading system and method use the same trade setups. The differences then become the setup components and/or whether the setup can be traded:
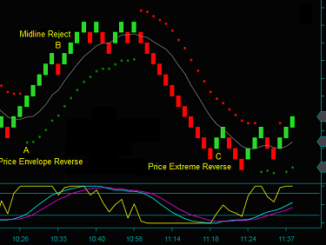
- Our Renko trading strategies have 3 setups (1) price envelope reverse (2) midline reject (3) price extreme reverse
- The Renko system will trade the midline reject and price extreme reverse regardless of any trade filters
- In order to try and avoid the price envelope reverse inside of consolidation, the system can only trade the price envelope reverse if it would be through a previous swing diagonal of at least 5 bricks
- The Renko method will trade all strategy setups unless they are filtered for price, consolidation, or because they are counter momentum
- Don’t trade any of the setups unless there are at least 3 bricks of room to the next support or resistance price
- Don’t trade any of the setups inside of consolidation – we do have a specific consolidation breakout setup
- Don’t trade any of the setups against the direction of our slow momentum indicator
So, some of these simply are trade setup components that are not hard to identify. But those that are trade filters for price and consolidation, will take longer to learn and understand. However, it is also these filters that can ultimately make the Renko method more profitable than the Renko system.
The following link will discuss the Renko trade setups and filters in greater detail: Renko Trade Setups And Trade Filters
Renko Trading Strategies Chart And Video
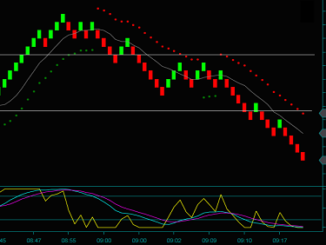
Differences and tradeoffs between the Renko trading strategies for system and method will be discussed further using the Renko chart below.
I selected this trading period because it shows all of our trade setups. And then after trading, it became very apparent that this chart was a great example to use for talking about the tradeoffs between the system and method trades that occurred.
Trading the Renko trading method was more profitable than the trading system. And in this case, the filtering for setup location and the trading prices was actually very easy.

Renko Trading Strategies Setups
To begin with, note the gray lines – when the trading period began, the top line was price resistance and the bottom line was price support. Additionally, I want to show the ‘key’ for the colored circles on the chart:
- Blue circles – Renko method setups only
- Orange circles – Renko system setups only
- Yellow circles – Renko method and system setups
- Purple circles – Renko method pattern setups
The Renko setups and trades marked on the chart will be discussed at greater length in the trading video. But I do want to point out the yellow circles that show each of our Renko trading strategies and were setups for both the method and the system:
- Yellow circle1 – price envelope reverse buy
- The setup occurs when the price envelope dots shift to green on the bottom and the slow momentum blue line crosses the purple line
- For method, there must be 3+ bricks of room to the bottom gray line that is now price resistance
- For system, there must be at least 5 bricks of room to the high of the previous trading swing
- Yellow circle2 – midline reject
- The setup occurs when there is a counter brick reject of the envelope midline
- The setup must also have continued flow of slow momentum and a fast momentum ‘hook’ back through the upper extreme
- For method, there must be 3+ bricks of room to the bottom gray line that is now price resistance
- For system, the setup will be traded regardless of price or the size of the previous swing size
- Yellow circle3 – price extreme reverse
- The setup occurs when there is a 5+ brick move after the last price envelope reverse or last trade setup
- For method, there must be 3+ bricks of room to the bottom gray line that is now price support
- For system, the setup will be traded regardless of price or the size of the previous swing size
Click Link To Watch Video: Renko Trading Tradeoffs For System And Method
Be the first to comment