
When I refer to Renko chart selective trade setups, I am talking about trades that would include more setup components than our Renko indicator combinations. This trade setup distinction is significant, because by adding these additional setup components the profit odds of the trade increases, which is especially important during low odds trading periods.
I am differentiating the Renko chart selective trade setups with what I think of as Renko chart base trade setups. The base setups include our price envelope reverse, midline reject, and price extreme reverse indicator combinations. These are the method trade setups that are continually traded, providing that they have not been filtered for price, momentum, or consolidation.
Renko Base Trade Setups Description
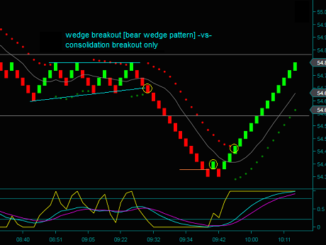
By comparison, a selective trade setup would have additional trade setup components besides the indicator combinations used for our base trade setups. For instance, a Renko selective trade setup would include price extreme rejects or trading price failure breaks OR they would include trades with additional breakout potential, like trades through a previous swing diagonal or through an across the chart trendline.
Renko Chart Trading Conditions
Identifying Low Odds Renko Chart Trading Conditions
Identifying a trading period that would have low odds for Renko base trading would be important, considering that while we are trading all Renko trade setups that are not filtered by price, momentum, or consolidation would be traded. And this would include stop and reverse trading, which is what a price envelope reverse followed by a price envelope reverse or a price envelope reverse followed by a price extreme reverse would be.
The Renko method is traded like this, because ‘picking and choosing’ trades really can’t be done. Saying that tradeA will be profitable but tradeB will be a loss when both trades are Renko base setups would end up giving trading results that become skewed.
BUT there are low odds trading conditions besides consolidation that you can see develop on a chart. Think of these as narrow trading ranges that don’t give any range expansion, with many trading swings that are price envelope reverses that don’t even go to the range extreme, along with the following characteristics:
- Activity and volume slow down inside range
- Multiple price envelope reverses – some with lagging mex and many not going to mex extreme
- Price envelope reverses that just have partial profit room but no room for multiple partials
- No diagonals to trade through
This is the example of low odds Renko chart trading conditions and once identified it would be to stay flat until there was a Renko selective trade setup, which would increase the odds of profitable trading.
What Is A Renko Selective Trade Setup?
A Renko base setup is a trading method ‘minimum’ trade setup. For instance, a price envelope reverse, with MEx direction and 3+ bricks of room to a profit target, providing that it is not traded inside of consolidation.
Now take that same price envelope reverse and add the following trade setup components:
- MEx flow instead of MEx direction only
- A Renko trading price failure break, meaning that a support or resistance price fails to remain support or resistance
- Diagonal breakout potential through the previous swing or an across the chart trendline that is multiple partial profit width
And you have turned the base setup into a Renko chart selective trade setup.
Renko Chart Selective Trade Setups Video
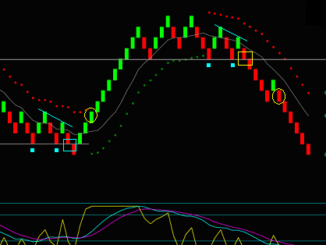
The Renko chart trading video will be discussed for how and why this became a low odds trading period between the 2 gray lines, especially when the blue line that was the higher before the upper gray line higher high was added to the chart.
Consider the markings on the Renko chart below:
- Why the 5 purple lines were Renko base setups that were either filtered for the trading conditions or for price – in each case a losing trade was avoided
- Why yellow circle1 was a selective trade because besides having an indicator combination setup there was also a double bottom support price test, followed by a triple break of the 2 highs before support held
- Why yellow circle2 and yellow circle3 were Renko chart selective trade setups that were very good setups for any trading condition
- Both trades were midline rejects with MEx flow and a fast momentum hooks – these are regarded as continuation trades in base method
- And both trades had the additional selective setup components of being support failure breaks, along with the diagonal break potential gained from trading through the orange trendline

Click Link To Watch Video: Renko Chart Selective Trading Setups
How much is membership? And is it a one time charge or monthly recurring? Program looks very good. Thanks. Robert
Robert, membership is a monthly recurring charge that is currently $55/month. The membership includes trading-training videos, of which I typically add 2 new ones each week – along with the usage of my trading indicators that are coded for NinjaTrader.
You can get more information on the following webpage: https://renkocharttrading.com/renko-chart-day-trading-strategies/
Barry