
Our Renko indicator trading strategies include trade setup filters that are used to keep from trading against low odds. I think of a trade setup filter as a way to avoid trading against conditions that would decrease the typical profitability of the Renko trade setup.
For instance, regardless of the trading strategy or setup, we will consider a trade as being filtered if the following exists at the time of the trade:
- The trade entry is into a Renko trading price with less than 3 bricks of room
- The trade entry is a counter Renko brick – don’t enter buys or red bricks or sells on green bricks
- The trade entry is against momentum, either because slow momentum has lagged or because there is a price momentum divergence
- The trade entry would be inside of consolidation
This is also what I think of as the difference between a Renko trading method and trading system. My experiences are that by using Renko chart trading strategies, instead of trading a system mechanically, has been more profitable.
Although there are times where profitable trades may be missed because of Renko indicator trading strategies filters, there are more losing trades that will be avoided. And thus, trading profitability will be increased.
Renko Indicator Trading Strategies Discussion
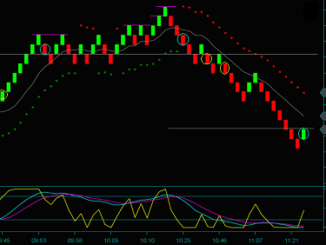
Let’s look at the Oil Renko trading chart below, and discuss which trading strategies were traded and which of the trade setups were filtered. The chart has been marked with circles to indicate the following:
- Yellow circles = Renko indicator setups traded
- Blue circles = Renko trade setups filtered for price
- Purple circles = Renko trade setups filtered for momentum or entry on a counter brick

Renko Trade Setup Price Filter
The Renko chart trading prices are at the gray lines: (1) the top gray price line was the previous day high (2) the bottom gray price line was a left side swing double top. The Renko price filter causes trades that have less than 3 bricks of room to be avoided:
- Blue circle1 price envelope reverse 2 bricks from support – no trade
- Blue circle2 midline reject with slow momentum flow and a fast momentum hook, but also 2 bricks from support – no trade
- Blue circle3 price extreme reverse at the shift of resistance to support – no trade
- Blue circle4 midline reject with slow momentum flow and a fast momentum hook, but 2 bricks from support – no trade
Although all 4 of the blue circles were clear Renko indicator trade setups, they were filtered for price – and all 4 were losing trades that were avoided.
Renko Trade Setup Momentum Filter
All Renko indicator trade setups must be entered with slow momentum moving in the direction of the trade. In the case of the midline reject trading strategy, there must also be a Renko chart fast momentum hook.
I consider trade entries on counter bricks as being filtered for momentum as well.
- Purple circle1 4 brick midline reject with no slow momentum flow or a fast momentum hook – no trade
- Purple circle2 3 brick midline reject with no slow momentum flow or a fast momentum hook – no trade
- Purple circle3 price envelope reverse sell on a green brick, and also note the trade would have been price filtered regardless – no trade
- Purple circle4 price envelope reverse buy before slow momentum crossed back again – no trade
The purple circle4 trade setup was a missed winning trade, but the other 3 purple circles were losing trades avoided. Consider that if the purple circle1-2 buys were done, they would have been reversed at purple circle3, so they would have all been losers.
Renko Indicator Strategies Traded
The yellow circle Renko indicator setups were all traded. And something very important to note – the price and momentum filter also became a trade management strategy used to hold the first buy after it broke through resistance:
- Yellow circle1 price envelope reverse buy [couldn’t go long on the red brick], with 3+ Renko bricks of room to price
- The trade was profitable with 4 bricks for partial profit1 and 4 bricks for partial profit2
- Yellow circle2 midline reject with slow momentum and the fast momentum hook
- This was an addon to yellow circle1, since the trade was held through the blue circle2 and purple circles filtered trades
- This was a losing trade of 1 brick, which occurred on the yellow circle3 reverse -vs- a 4 brick stop loss
- Yellow circle3 price envelope reverse, with 3+ Renko bricks of room to price
- The trade was profitable with 4 bricks for partial profit1 – the Renko bricks continued down to price, before rejecting and reversing
This 2 hour trading period may have had more trade setups filtered than typical for that amount of time. However, that being said, the filtered trades did occur and were all losing trades except 1 – and the profitable buy swing was not missed, because of yellow circle1.
Using our Renko indicator trading strategies, together with trade setup filters, is a consistently profitable method of trading.
Be the first to comment