What is a Renko chart triangle?
The Renko chart triangle is a price compression pattern. This means that the movement is contained inside an uptrend line and a downtrend line. A triangle can be worse for trading than sideways consolidation since you don’t know the range high or low prices.
As such, you do not want to trade inside the triangle patterns and not until there is a breakout setup. Chart examples below will be used to discuss these issues and trade strategies in detail.
How is a Renko chart triangle made?
A Renko chart triangle is a pattern that develops when a higher low and lower high follows the price swing high and low. You will see the triangle when you draw a trendline from the swing high through the lower high and from the swing low through the higher low.
Renko Triangle Pattern – Key Takeaways
|
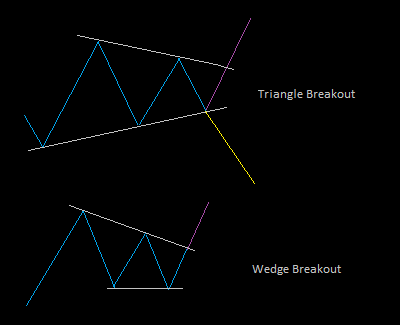
The Renko chart triangle will break out in either direction, regardless of the swing into the triangle. In comparison, a breakout pattern like a wedge tends to break out in the direction of the previous swing.
You will see chart examples of Renko triangle pattern breakouts below. One chart will show an upswing to resistance into the triangle and a break out towards support. At the same time, another chart will show a downswing to support into the triangle and a breakout back towards support.
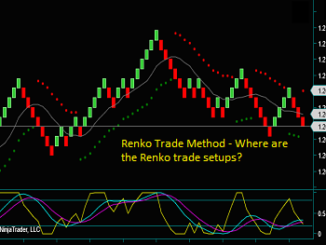
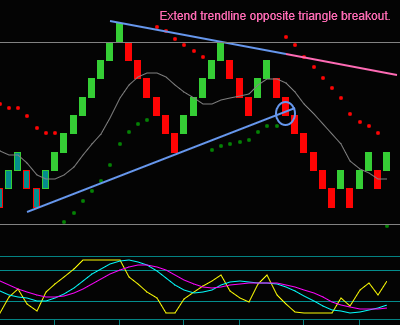
Renko Chart Triangle Pattern
The chart shows the Renko triangle pattern structure. As you can see, you do not want to trade inside the triangle – the price does not continue but keeps reversing.
- Swing high and low – determines key price points that need to break for price continuation.
- Instead of breaking the high or low, there is a move down to a higher low followed by a move up to a lower high.
- Draw 2 trendlines to define the triangle pattern.
Note after the triangle breaks out, extend the trendline opposite the breakout. You will see why this is important in the charts below.
Don’t Trade Inside Of Triangle Patterns
You want to avoid trading inside a triangle – wait for the breakout setup.
What happens inside a Renko chart triangle?
Looking at the Renko price envelope indicator, you can see the multiple reverses inside the trendlines defining the higher lows and lower highs.
- With the multiple price envelope reverses, the midline starts moving horizontally.
- Price loses momentum inside a triangle.
- Slow momentum [blue-purple lines] is flat and in the middle of its range.
- Fast momentum [yellow line] stays inside its extreme lines.
How Does A Renko Triangle Pattern Breakout Set Up?
Remember the price concept that doubles hold and triples break. Since a trendline has 2 points, a breakout is a triple-break setup.
Other keys to the triangle breakout and price continuation:
- Breakouts through trendlines have less resistance than horizontal lines.
- The loss of momentum resumes and leads the price as it approaches an extreme.
And in the case of this Renko triangle breakout, a support or resistance price has been tested and rejected first. Additionally, the price envelope reversed in the direction of the breakout trade.
As is often the case, there is price continuation to support or resistance after the triangle breakout. This chart shows support as a combination of where the uptrend line began and the horizontal price line.
Why extend the trendline?
Now, look at the extended trendline. After the price holds support, there is a reverse and test of the trendline that remains resistance – this is why we extend the trendlines.
And in this case, not only does the price reverse again, it moves into a 2nd Renko chart triangle pattern.
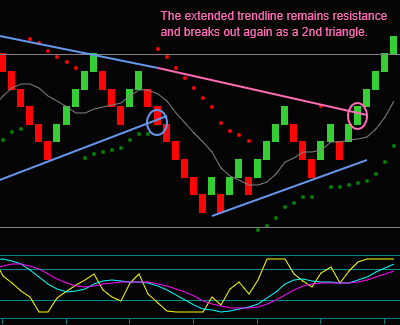
Like the blue circle triangle breakout sell, buy the purple circle breakout buy.
And especially look at the resumption from flat, slow momentum and the fast momentum hook that leads the breakout back to the price resistance line.
Another Renko Triangle Breakout Chart
Let’s look at another Renko triangle. You can see the price swing where the trendlines start, followed by the lower high and higher low that the trendlines pass through.
The blue circle is the triangle breakout trade.
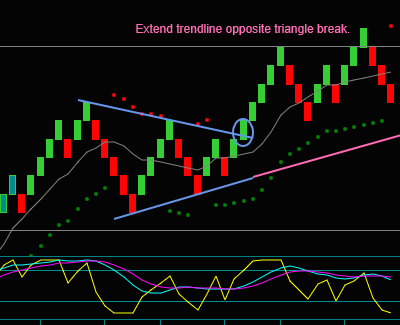
The trade is very similar to the breakout sell above – but here, you can see the difference between a Renko indicator trade and a pattern trade.
- Slow momentum is flat and in the middle of its range.
- The price envelope midline is also moving sideways.
- But note the price envelope indicator reverse brick – you can’t take this trade because the trendline would filter it as resistance.
- The price envelope reverse trade synched with the Renko triangle breakout on the first chart.
- But these are not indicator trades, regardless. These are pattern breakout trades.
The purple circle breakout was a buy, so extend the uptrend line as support if trading into it.
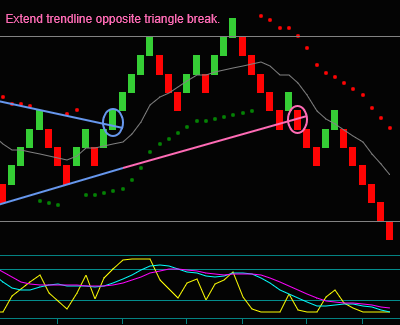
The extended trendline doesn’t become part of a 2nd Renko triangle breakout trade like the first chart, but it is a support price that filters the price envelope reverse sell. And after it hits and retraces, we get a breakout trade setup.
For our Renko strategies, you filter trade setups unless there are 3 or more bricks of room – this trade would only have 2 bricks. But after the trendline hits, you get a combination indicator trade-price [trendline] breakout trade at the purple circle.
- Midline reject with slow momentum full and a fast momentum hook
- Trendline [support] break2 with the momentum described
Sell the purple circle as a trendline failure break trade – the trendline fails to remain support.
Renko Chart Trading Strategies
We have been looking at Renko chart triangle patterns and breakouts. I want to continue discussing these in greater depth and how breakout trades combine with our Renko chart strategies.
Remember that triangle breakout trades are not indicator trades, although they often synch with the indicator strategy components.
Some of the key things to look at include:
- The Renko price action inside the triangle where momentum is lost, and trades are filtered.
- Renko base setups before the price compresses into the triangle pattern.
- The triangle or price breakout trades
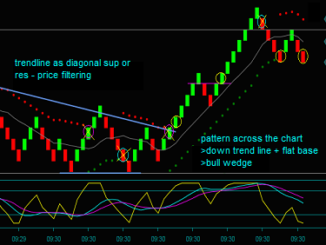
Renko Trading Chart1
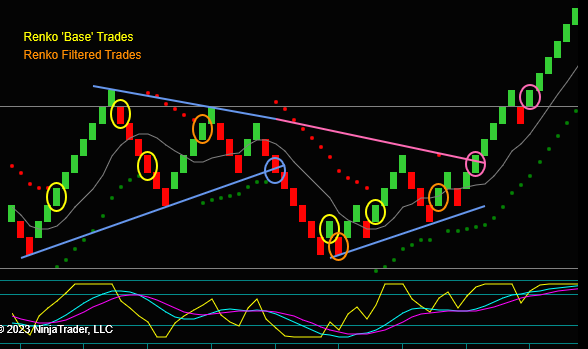
- The yellow circles are Renko method trade setups.
- These Renko trade setups have at least 3 bricks of room and a slow momentum cross.
- YCircle1-2-3 are ‘base’ trades with the necessary indicator components. None of the yellow circles are inside the triangle pattern.
- YCircle3 may look like it’s inside the Renko chart triangle, but there is no triangle yet – you don’t have a 2nd point for the trendline yet.
- Look at momentum and price action after the triangle breakout. Price moves to support, and momentum breaks the extreme line, making YCircle4 a price extreme reverse buy.
- YCircle5 is then a price envelope reverse addon – you have more than 3 bricks of room to the triangle pattern extended trendline as resistance.
- YCircle1-2-3 are ‘base’ trades with the necessary indicator components. None of the yellow circles are inside the triangle pattern.
- The orange circles are filtered trades.
- Filter OCircle1 for momentum and the resistance price.
- Filter OCircle2 for the support price.
- Filter OCircle3 for momentum and brick color – do not sell a price envelope reverse green brick.
- Blue circle1-purple circle1 – these are the Renko triangle breakout trades.
- You can see the momentum and price action on the breakout – going from price compression inside the triangle and losing momentum to an expansion to support or resistance.
- PCircle1 is unique as a 2nd triangle breakout.
- Purple circle2 is a Renko price breakout trade.
- This trade is a price resistance failure break.
- You can see how momentum leads to price continuation and a break in the resistance price.
- Slow momentum flows up on the retrace after the first price break.
- Fast momentum hook on the price breakout.
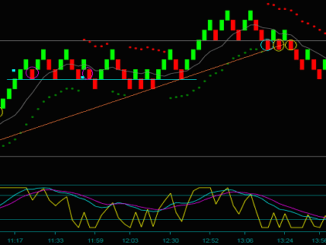
Renko Trading Chart2
The Renko chart triangle breakout trade is essentially the same as the first trading chart. But the remaining trades have more decisions to make, especially for management.
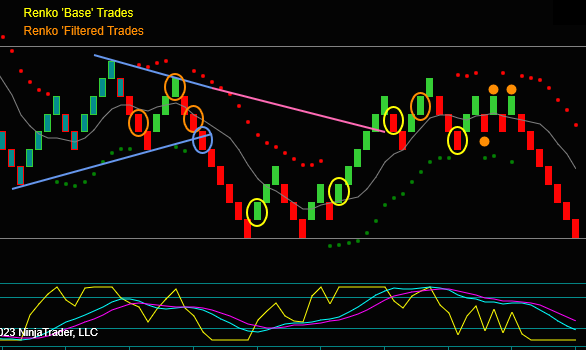
- The yellow circles are Renko method trade setups.
- YCircle1 comes after the triangle breakout and a hold-reject of support.
- YCircle2 follows as a price envelope reverse addon – you can see the requisite 3+ bricks of room to the triangle extended trendline.
- There is no trendline breakout trade, as seen in the first chart.
- YCircle3 is a price extreme reverse sell with YCircle4 a price envelope reverse sell – but how are these 2 trades affected by OCircle4?
- OCircle4 is a midline reject and a swing resumption [the price envelope never reversed].
- But you would filter the trade for momentum – the blue line is at its maximum extreme, and the purple line is almost there too.
- You are not stopped out for YCircle3 [there are 3 bricks against the trade – not 4], and there is no resumption trade, so YCircle4 is an addon to the held trade.
- This trade combination is what I meant above regarding trade management decisions.
- The orange circles are filtered trades.
- OCircle1 is not inside the triangle; there is no 2nd point for the trendline yet. But slow momentum has not crossed, so you can’t trade the price envelope reverse.
- OCircle2 is similar – the filter is not the triangle but lagging momentum.
- OCircle3 is inside the triangle and filtered for the trendline.
- OCircle4 is filtered as discussed above – there is no trade because of the momentum extreme.
Renko Trading Management
- There are numerous orange dot trading and management decisions – are there any open sells for the move down?
- Yes, Ycircle3-4 are both open on the last brick of the chart – all the orange dots are filtered, and neither trade is stopped out.
- ODot1 price envelope reverse buy – but slow momentum is down, and you don’t buy red bricks.
- ODot2 now has a price envelope reverse green brick, but slow momentum is still flowing down.
- ODot3 is a price envelope reverse-green brick but with slow momentum down.
- Yes, Ycircle3-4 are both open on the last brick of the chart – all the orange dots are filtered, and neither trade is stopped out.
Renko Chart Triangles And Trading Method
The Renko chart triangle breakout has been a beneficial addition to our trading method setups. Again, understand that the breakout setups are not indicator setups like our ‘base’ method trades but are additional trading strategies. This combination is based on trade setups that will have price continuation.
Besides using triangle breakout setups for day trading, these pattern trades are also effective for Renko options and position trading.
The triangle breakout setup works well with Renko chart momentum trading. A primary reason is that momentum is lost when the triangle pattern develops. And then, when the breakout occurs, momentum expands, leading to price continuation and bigger trading swings.
Click the link to watch a video discussing Renko chart triangles, pattern breakouts, and the combination with our trading method in greater depth.
Renko Chart Triangle Breakout Video